- Overview
- Specification
- Accessories
- Product Resources How to Buy
- Immediate display of water content
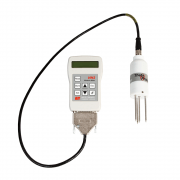
- Reads ML3, SM150T, PR2 (analogue and SDI-12) or WET Sensor
- Stores up to 1500 time-stamped readings
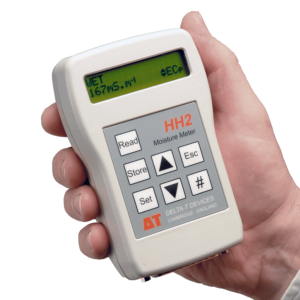
The HH2 Moisture Meter is a versatile readout unit for use with Delta-T soil moisture sensors. It can be used with the PR2 Profile Probe (both analogue and SDI-12* versions), ML3 ThetaProbe, SM150T and WET Sensors.
The HH2 readout unit offers impressive functionality in a compact, hand-held unit, designed for field use. Readings are displayed on the LCD and can be stored to memory for later download to a PC.
The unit can be operated with one hand, for convenience in the field. Each time-stamped reading includes a unique sample number, a plot identification number (A to Z), and a sensor location number (1 to 255).
The HH2Read Windows PC software provides a data import wizard for direct download into Excel or other PC spreadsheet packages, or into irrigation scheduling programs. Alternatively, data can be downloaded in comma-separated ASCII data file (.CSV) format.
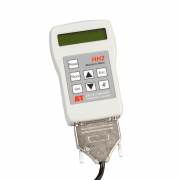
Data is transferred to a PC using the RS-232 cable provided with each unit. Please note that most PCs no longer have an RS232 port; for USB connection a USB to RS232 adapter cable is required (see Accessories).
*Please note that the HH2 only reads SDI-12 digital data from the PR2 SDI-12 Probe – it is not a general purpose SDI-12 meter.
Specification
| Input connections | 1 water content sensor or 1 WET Sensor |
| Control outputs | – |
| Readings stored | 1,500 |
| Recording rate | – |
| Configuration | By keypad |
| Communication options | RS232 / USB [1] |
| Sensor excitation | 1 switched battery |
| Power | 9 V 6LR61 (PP3)alkaline |
| Battery life (dependent on usage) | ~ 5,000 readings |
| Enclosure rating | IP54 |
| Temperature range | 0 to +40°C |
| Display | 2 line x 16 character |
| Size | 125 x 80 x 45mm |
| Typical applications | Instantaneous reading of soil moisture / profiles/ WET Sensor |
| Sensor compatibility (maximum number of sensors that could be connected [2] | |
| ML3 | ✓ without temp |
| SM150T | ✓ without temp |
| PR2 | ✓ |
| PR2 SDI-12 | – |
| WET Sensor | ✓ |
| EQ3 | ✓(mV only) |
| Temperature | – |
| Tensiometers | – |
| Counters or Events | – |
| Relay Output | – |
[1] With USB to RS232 Adapter Cable type USB-RS232
[2] With appropriate expansion cards and power supply arrangements
Accessories
Hardware
Main components and software
Mountings and enclosures
Installation accessories
Cables and networks
Remote communications
Spares and consumables
Power options
Other
Product Resources
Data Sheets
Software
Manuals
- Addendum for the HH2 User Manual - support for the SM300 80 KB
This addendum is for inserting in the HH2 User Manual and provides information about how to use it to take readings from the SM300 Soil Moisture Sensor. See also the Applications Note " Support for the SM300 Soil Moisture Sensor with an HH2"
Filename: hh2-user-manual-addendum-to-v4-sm300-support-v1-0 - Dataset Import Wizard Notes for HH2 Users, v3 22/11/2004. Document Code: none 414 KB
The Wizard describes how to import data from an HH2 Moisture Meter into Microsoft Excel spreadsheets.
Filename: hh2-dataset-import-wizard-um - HH2 User Manual version 4.3 2 MBFilename: HH2-UM-4.2
- HH2 Quick Start Guide Version 4.0 552 KBFilename: HH2 Quick Start v3.0
FAQs
-
How do I upload the WET sensor calibration file into the HH2 handheld reader unit?
Question
How do I upload the WET sensor calibration file into the HH2 handheld reader unit?
Answer
This can sometimes happen if the battery connector terminals are accidentally shorted out when changing the battery or if the user takes longer than 30 seconds to replace the battery. If this happens, the HH2 is cold booted, the memory is erased and the factory default settings are restored.
You will need to re-load the WET calibration file back onto the HH2:
1. Quick method for users with HH2 firmware 2.9 or above (Aug 2017).
Requirements:
HH2 firmware version 2.9 or above.
WET sensor serial number: WET-27/001 or later.• Connect the WET sensor to the HH2
• Turn the HH2 on> press SET> scroll up to ‘Load WET Cal’> press SET> scroll to ‘Load Standard’ (default) or ‘Load extended’ (if you are using the WET sensor in high salinity conditions)> press SET.
• The HH2 will display ‘Reading Calib’n’, then say ‘Calib’n Loaded’. Press Esc back to the main menu and take a reading – the WET sensor should now be automatically selected and will take a reading.
• If the HH2 displays ‘Cal Read ERR’, then the WET sensor may have a problem or be too old to work with this function. Contact Delta-T or try the normal PC method below.
• Don’t forget to check other settings such as temperature compensation, units and soil type.
• If you want to verify the cal file has been installed, go to options>status>versions>WET Calib’n to check the number matches your sensor. If the file starts with ‘WET’ you have the standard calibration loaded in and if the file starts with ‘WEX’, you have the extended calibration loaded in.
2. Normal PC method
• Install the ‘HH2Read’ software on to your computer – if necessary, you can download it from our website: http://www.delta-t.co.uk/software-downloads.asp.
• The calibration file, for older WET sensors, is supplied on the CD that comes with the WET sensor (picture of a WET sensor on the CD, with the serial number on). If you don’t have this CD, or your computer doesn’t have a CD drive, you can download the file directly from our website: http://www.delta-t.co.uk/product/wet-2/#support. Alternatively, contact Delta-T tech support and we’ll send you the calibration file via email.
• Connect the HH2 to your PC using the 25w to 9w adaptor and the serial cable (2 separate parts).
If your computer does not have a 9pin serial port in the back of it, you will need to purchase a USB to RS232 adaptor. We can provide one of these, if necessary (sales code: USB-RS232), or you can purchase one locally. If you do purchase one locally we recommend that it has an ‘FTDI’ chipset in it.• If you have stored any readings, you’ll need to erase the data:
Turn the HH2 on> press SET> scroll to data> press SET> scroll to erase> press SET> scroll to YES> press SET.• Make sure the HH2 is switched off before trying to communicate with it:
Press the ESC key to exit out of the menu structure, then press ESC once more to turn the unit off. Alternatively wait for it to go to sleep automatically after 30 seconds.• Run the PC program HH2Read (you need version 1.82 or later).
• If you have the CD, insert into your CD drive on the computer.
• In HH2Read select Install> Sensors Calibration> WET Sensor.
• Navigate to the CD drive on your computer or the PC save location, if you downloaded form our website. Then select the WET sensor calibration file.
• In a few minutes the program should report the calibration file successfully installed.
• Once the file has been loaded back on, please select the WET sensor device option in the HH2:
◦ Turn the HH2 on
◦ Press the SET button
◦ Scroll down to Device
◦ Press SET
◦ Scroll down to WET sensor
◦ Press SET• Don’t forget to check other settings such as temperature compensation, units and soil type.
You should now be ready to take readings again.
-
How do I cold boot (reset) the HH2 Moisture Meter Readout Unit?
Question
How do I cold boot (reset) the HH2 Moisture Meter Readout Unit?
Answer
To cold-boot the HH2 proceed as follows:
- Disconnect the battery.
- Short out the battery connection terminals with a metal object, e.g. a screwdriver blade.
- Reconnect the battery: snap the connector in place in a single continuous action.
- While doing so, observe the display and ensure that:
a) the entire display blacks out
b) no error messages are displayed
c) the title screen 'Delta-T Devices Moisture Meter' is displayed.
As all volatile memory will be cleared, you'll have to check your settings are ok (soil calibration, for example) and change if necessary. Also, if you are using a WET sensor, you'll have to load the WET calibration file back on (see other FAQ about this).
-
How do I set up my USB to RS232 convertor? – Photo Guide
Question
How do I set up my USB to RS232 convertor? - Photo Guide
Answer
- These convertors usually come with a website link to visit and download the drivers. Please make sure you download the drivers. Then follow all the on-screen instructions correctly.
- If you have purchased the device from Delta-T, you can download the drivers from here: https://www.dropbox.com/s/2pu0ll8b26y8qkm/CDM212364_Setup.exe?dl=0 or here: https://ftdichip.com/drivers/vcp-drivers/
- Once the drivers have been installed correctly, plug the USB convertor into a USB port on your PC.
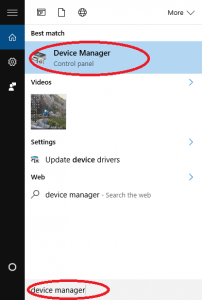
- The computer will then assign the convertor a COM port. You will need to check which com port has been assigned via the computer’s “device manager”:
Windows 10
Use the search tool in the bottom task bar to search for ‘device manager’:
Windows 8
Right click on Desktop background and select ‘All Apps’Right click on control panel and select ‘properties’:

Click on Device Manager:
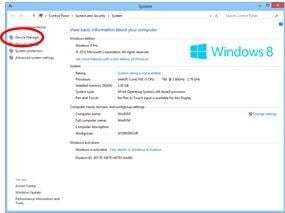
Windows 7
Click on Start, Control Panel, Device Manager:
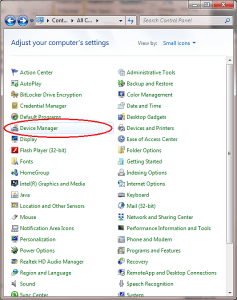
XP
Click on Start, Control Panel, System:
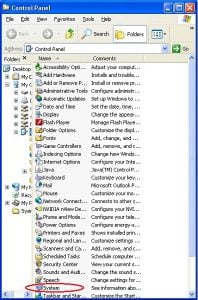
Under the ‘Hardware’ tab, click on ‘Device Manager’:
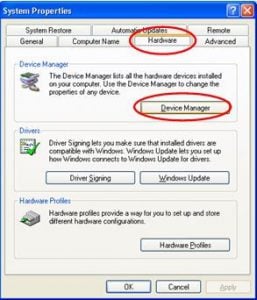
- Once in the device manager, expand the “ports” option. The example below shows a P.C which has the USB to serial converter installed (COM3):
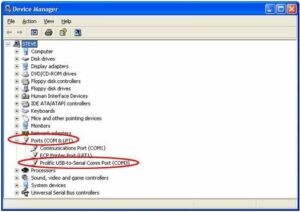
- Please make sure that you use this same COM port number in the device software e.g. HH2read, SunRead, LS2win, DeltaLINK, AP4 retrieve.
- You will probably have to re-boot the P.C once the drivers have been installed.
- Also, please remember to use the original RS232 cable, that was supplied with your device, in series with the RS232 to USB converter.
Multiple USB convertor Installations check
If you have more than one USB to RS232 convertor installed, you can check which COM port has been assigned to the one you want to use, by doing the following:
- Unplug the USB convertor
- Open Device Manager > Ports (COM & LPT)
- Plug in the USB connector and observe which COM port is added to the list.
Regulatory Information
- HH2 Meter EC Declaration of Conformity 80 KBDownloadFilename: hh2-meter-ec-declaration-of-conformity


